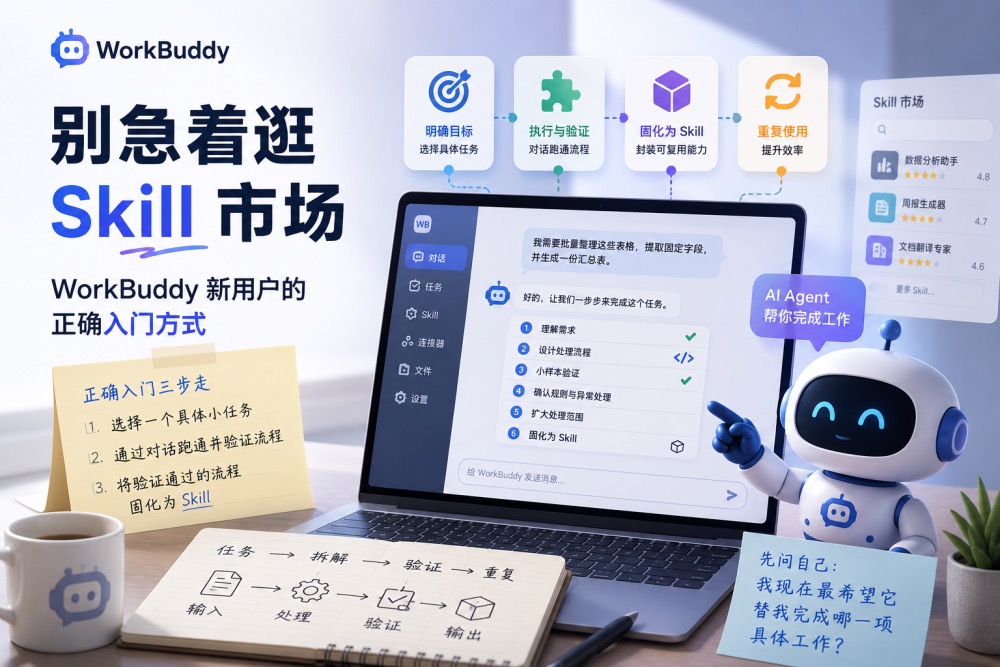
Recently, I had an idea: write an introductory guide to WorkBuddy for everyday users.
The spark came from a discussion in my college alumni group chat.
Several former classmates had tried WorkBuddy and came away with similar impressions: it looked feature-packed, but when put to actual work, it felt clunky and never quite seemed to meet their needs.
Digging deeper into their conversations, I realized that “WorkBuddy is hard to use” isn’t just a simple product critique. There are two main reasons behind this sentiment: first, WorkBuddy’s interface and onboarding can easily overwhelm newcomers; second, most people are still approaching it with the mindset of traditional software.
At its core, WorkBuddy is neither a traditional suite of fixed features nor an early-stage AI chatbot where you simply prompt an LLM back and forth.
Important It is a true AI Agent capable of calling local tools, manipulating files, and extending its capabilities through Skills.
Understanding this distinction is the essential first step to mastering WorkBuddy.
1. Why WorkBuddy Easily Overwhelms New Users
When Tencent launched WorkBuddy, it rapidly integrated a vast ecosystem of Experts, Skills, Connectors, and external services.
While these power WorkBuddy’s rich capabilities, they also create an obvious hurdle: too many entry points, too many concepts, and no clear starting line for beginners.
Especially for users who haven’t worked with AI Agents before, opening WorkBuddy for the first time feels less like picking up a handy tool and more like facing a complex enterprise system with a steep learning curve.
In this situation, newcomers usually fall into one of two extremes:
The first group heads straight for the Skill Store. They search for keywords across “Experts, Skills, and Connectors,” hoping to find an out-of-the-box solution that perfectly fits their needs. They install anything that looks close, try it out, and when it falls short, they search and install more. After several frustrating rounds without finding an exact match, they inevitably conclude:
“WorkBuddy looks like it has a lot of features, but none of them actually work for me.”
The second group assumes that because it’s a complex tool, they must learn everything before touching it. They pore over documentation, analyze every button and menu, and binge entire tutorial video series. They hesitate to actually use the tool until they’ve finished all the guides, feeling perpetually unprepared.
While these two approaches look completely different, they stem from the exact same misconception: treating WorkBuddy like a traditional piece of software with fixed, predefined functions.
2. Why the Traditional Software Mindset Fails with WorkBuddy
With traditional software, our instinct is to look for dedicated feature buttons.
Need to edit an image? Find the photo editor. Want to export data? Look for the export button. Need batch processing? Search for a specialized plugin.
WorkBuddy, however, isn’t just an application waiting for you to click buttons—it’s an AI Agent. It interprets your goals, invokes local tools, executes code, and packages repetitive workflows into reusable Skills.
Therefore, the right starting question in WorkBuddy is not:
“Is there a Skill in the store that matches my exact need?”
Instead, ask:
“What specific task do I need to accomplish right now? How can I break it down, verify it, and make it repeatable?”
These two questions might seem subtle, but they lead to radically different results.
Another common pitfall is applying typical conversational AI habits directly to file processing and automation tasks.
In open-ended chat Q&A, a degree of ambiguity is acceptable. Even if an answer misses a detail, you can still extract value or refine it with follow-up prompts. However, when it comes to spreadsheet conversions, batch renaming, data cleaning, or API calls, a single logic error in any step can corrupt the entire outcome.
You cannot simply toss a vague “process this for me” at WorkBuddy and expect a flawless result on the first try.
A far more reliable approach is:
- Clarify requirements via dialogue: Explain what you need and have WorkBuddy confirm it truly understands your goal.
- Outline the approach: Ask it to detail how it plans to handle the task—preferably by writing and running code rather than just describing steps in text.
- Verify with small samples: Test the logic on a few sample files or rows to ensure the output matches your expectations.
- Define edge cases and rules: Confirm inputs, outputs, and exception-handling rules to ensure consistency.
- Scale up execution: Once verified, expand the scope to process the full dataset.
- Package into a Skill: If this is a recurring workflow, turn the verified process into a reusable Skill for future one-click runs.
Throughout this entire process, you never need to write or inspect code yourself—you only need to communicate using plain, natural language.
3. How New Users Should Actually Get Started
For anyone just starting out with WorkBuddy, my top piece of advice is: Do not start by installing a bunch of Skills.
The built-in capabilities and default Skills are more than enough to help you understand how WorkBuddy operates and handle plenty of day-to-day tasks.
A much smoother onboarding journey follows these three steps:
Step 1: Pick a Real, Concrete Micro-Task
Avoid broad, vague goals like “help me boost productivity.”
Pick a real, self-contained task you actually need to get done today with an easily verifiable outcome, such as:
- Cleaning and reformatting a spreadsheet;
- Extracting specific fields from a batch of documents;
- Calling an existing API to generate an image;
- Converting a few files according to strict naming/format rules;
- Generating a weekly report from a fixed template.
The more concrete the task, the easier it is for WorkBuddy to understand your intent—and the easier it is for you to verify the results.
Step 2: Validate the Full Workflow in Chat First
On your first run, don’t rush to create a Skill.
Work through the requirements in chat first, making sure to clarify:
- What the input data is;
- What the exact processing steps are;
- Where the output should be saved;
- Which constraints or rules cannot be changed;
- How to handle errors or exceptions;
- What criteria define a successful run.
If the task requires running Python code, you can have WorkBuddy check your local environment first:
Please check whether a Python environment is available for WorkBuddy to use.

If not, explain your proposed installation method, directory, and required permissions.
Once done, run a minimal test script to confirm Python executes properly.
Don’t blindly approve all permission requests. Whenever system directories, environment variables, or software installations are involved, double-check whether those permissions are strictly necessary for the current task.
Step 3: Turn the Verified Workflow into a Skill
You only need to create a Skill once the workflow has been tested, validated, and identified as a recurring need.
For example, suppose you have an API that generates images using a gpt-image-2 model. You could prompt WorkBuddy like this:
Please create a Skill named "create-image" for me.

This Skill should use Python to call my image generation API and generate images using the gpt-image-2 model.

Before creating it, please confirm the following details with me:
1. API endpoint and request payload format;
2. Secure API key configuration (do not hardcode the key in the script);
3. Supported image dimensions;
4. Default save directory for output images;
5. File naming convention;
6. Retry logic and error handling if a request fails.

Once created, test it with a minimal working example.
During this interaction, WorkBuddy may ask follow-up questions regarding image dimensions, output directories, or filename patterns. Once these details are settled, it will solidify the entire workflow into a Skill.
Once the Skill is ready, simply open a new task, type / in the prompt box, select create-image, and enter your generation prompt.
4. When Requirements Change, Don’t Tear Down the Original Skill
Suppose your initial create-image Skill only supported text-to-image, but later you want it to support uploading multiple reference images to guide generation (image-to-image).
You don’t necessarily have to overwrite your existing Skill. To avoid breaking an already stable workflow, you can build a new Skill alongside it:
Keep the existing configuration and behavior of "create-image" intact—do not modify the original Skill.

Based on it, create a new Skill named "create-image-edit".
The new Skill should support uploading multiple reference images as request parameters to generate new images via the gpt-image-2 model.

Please verify whether the API supports multi-image input, as well as image format and size constraints, before completing the implementation and testing.
The advantage here is that your original text-to-image workflow remains rock-solid, while the new image-to-image feature is isolated in its own dedicated Skill.
Final Thoughts
The true value of WorkBuddy doesn’t lie in how many pre-made tools exist in the Skill Store; it lies in its ability to gradually adapt to your real-world workflows.
For new users, the goal isn’t to master every single setting or stockpile dozens of Skills. It’s about remembering three simple principles:
- Start with a concrete, easily verifiable micro-task.
- Test and validate the workflow through dialogue first.
- Only turn it into a Skill when it becomes a recurring need.
Stop asking: “What can WorkBuddy do?”
Ask yourself instead:
“What specific task do I most need off my plate right now?”
That single question is the real starting point for mastering WorkBuddy.